Turtle Tank Filters
Turtle Tank Filters
Long Live Your Turtle LLC is an Amazon Associate and will earn a small commission from qualifying purchases when Amazon product links on this page are utilized. Additional Disclaimer information is provided at the bottom of this page.
Key Turtle Tips:
- Canister Filters are the best filters for aquariums with turtles
- Flow rate should be 6-8+ times the amount of water in the tank per hour
- Filter should keep turtle tank clean for at least a month, otherwise you are working too hard
- Hang on the back and internal filters are not optimal for turtle aquariums
NITROGEN CYCLE

When it comes to the time investment into your pet turtle, an aquarium filter is the most important feature of your tank. Your turtle poops, pees, eats, and repeats in their aquarium. With an adequately sized filter(s), maintaining healthy habitat for your turtle will be MUCH easier.
If you are familiar with general fish keeping, you have definitely heard of the nitrogen cycle. A successful nitrogen cycle is what keeps any stocked aquarium in a balanced state that ensures toxic ammonia and nitrites produced from the breakdown of waste in water is transformed to nitrates. Nitrates are less toxic than ammonia and nitrites. However, an excess of nitrates can lead to unhealthy water conditions. To remedy a build up of nitrates, water changes are required. Another way to reduce nitrates is to have plants, which can absorb nitrates. Note, turtles eat plants and in an aquarium, it can be difficult to keep plants with turtles.
And how does a good filter fit into all of this? Aquarium filters collect waste, convert ammonia to nitrites and nitrites to nitrates. It can get a little more complicated when it comes to the transformation of the nitrates to nitrogen gas which would complete the entirety of the nitrogen cycle. This transformation can be very difficult to achieve and is rarely accomplished. If you would like to learn more on how this full cycle can be achieved, I recommend an awesome dude who goes by the youtube name of pondguru. Check out his Youtube channel here: https://www.youtube.com/user/pondguru/videos. He provides optimal setup of filters to achieve a full cycle! Yes he is selling his product (Biohome) but he is a legend in the hobby.
An adequate filter keeps the turtle tank water clean, is reliable, easy to maintain (cleanout), and runs quiet. This means that the tank has ZERO ammonia, ZERO nitrites and a low amount of nitrates in the water. This can be tested using the Master Test Kit (Find it here) which every aquarium hobbyist should have in their arsenal. Ammonia and nitrites should always be zero. To talk realistically, your buildup of nitrates should be gradual. As I mentioned earlier, a water change will reduce nitrates as they start to increase. After about one to three months, your filter should be cleaned out. Water changes should occur every two to four weeks. Water changes should range from 25%-50% of your water. Try not to remove too much water or have your filter turned off for too much time as this can kill off beneficial bacteria that relies on oxygenated water running through your filter. Your cleaning schedule is all dependent on your water conditions over time but this should be your goal for water filtration.
Turtle rule of thumb is that the filter should cycle the water in the tank 6 to 8 times per hour. This may seem like a huge number especially when you look at a filter’s flow rate vs. the “suggested” tank size. It is usually way less than 8 times. BUT odds are that the filter is talking about a tank stocked with fish, not a turtle that releases poops the size of fish.
Submersible filters are fine for small turtles that do not require a lot of filter power but will become obsolete and space wasters as the turtle grows. Hang off the back filters are big (with respect to its location), noisy (if your water level is low which it typically is for turtle tanks) and do not fit well with a wire mesh screen top. These three types of filters are explained in more detail below:

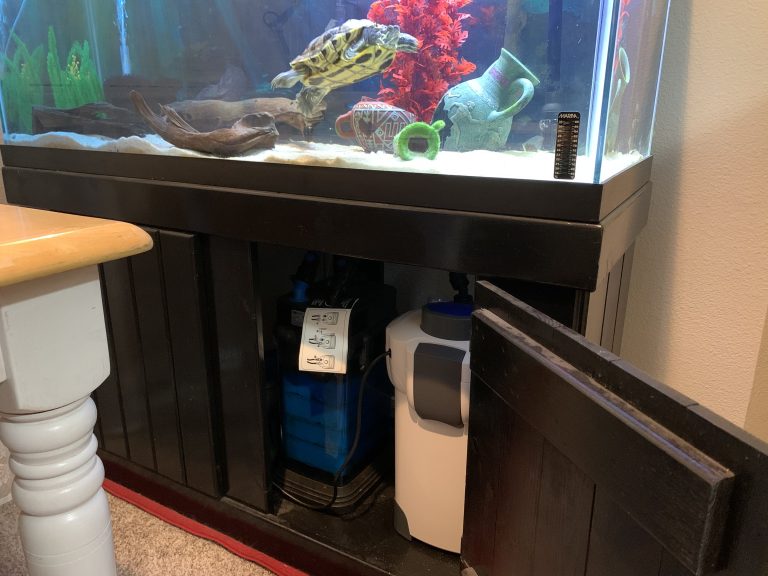
Canister Filter
Now the question is, what type of filter is best for turtles? The answer is canister filters. These filters typically have large reservoirs with lots of room for filter media. Read more about filter media below. They are installed outside of the tank, saving room, and are easy to maintain. Canister filters work by pumping water from your tank into a canister (like a sealed bucket/reservoir) via an intake tube. The canister is pressurized during operation. While the water travels through the reservoir it passes through filter media that could include sponges, ceramic rings, carbon, or other media types. After passing through the media the water is pumped back out of the canister through the output tube and back into the aquarium. A spray bar can be used to distribute the outgoing water in lieu of a singular nozzle. Many canister filters must be installed underneath an aquarium in order for them to operate as intended.
The Filter shown in the picture is a Fluval FX6- Get it here!

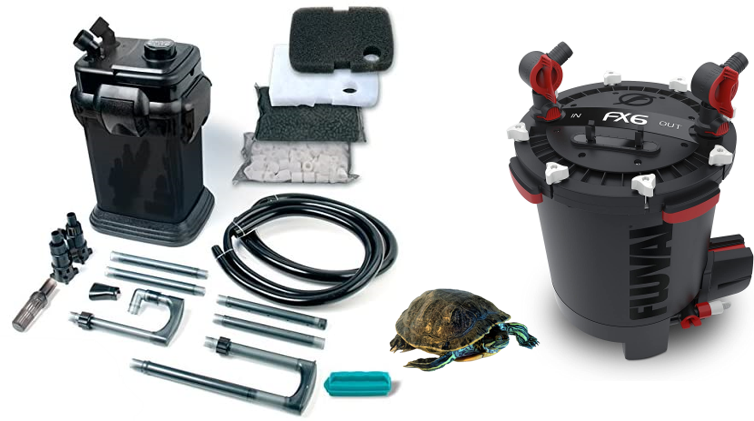
Internal Filter
Internal aquarium filters do exactly what you would expect, they filter tank water while submerged in the tank water. The filter media used in such filters as the canister filter including different sponges, beneficial bacteria media and carbon to name the basics. Internal filters come in many sizes but are more practical for smaller tanks. One thing to keep in mind with internal filters is that they take space in your tank. This space is shared with your turtle and therefore reduces the space available for your turtle. I recommend internal filters only for tanks that have room to spare. For example, a 20 gallon tank with a 1″ hatchling turtle.
A filter similar to the picture shown is a Turtle Clean 318- See it here!
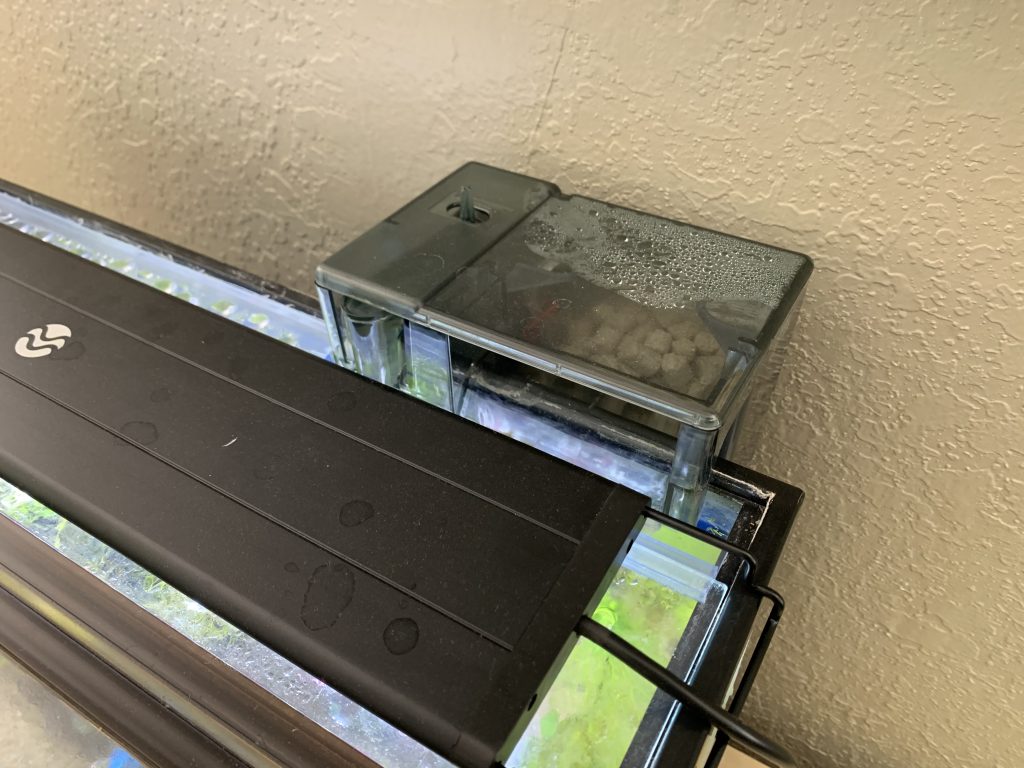
Hang On the Back (HOB) Filter
The last major category of aquarium filters is the hang on the back filter or HOB for short. These filters are extremely common for tropical and saltwater aquariums stocked with easy to maintain (low bio-load) fish. Like the name suggests, they hang on the back of your tank. They are really simple to clean as they are easy to access and are relatively light. Similar to canister filters, an intake tube carries water from the tank into the HOB filter. The water is forced through different stages of filter media and then waterfalls over the side of the filter into your tank. There is little pressure/priming that needs to be done to operate these filters. A major drawback of these filters when it comes to turtles? They have a limited amount of space for much needed filter media. Because the filter hangs onto your tank, they are limited to size and weight. Additionally, since they return water via a waterfall into your tank (uses gravity) your tank needs to be filled almost completely to avoid loud filter operation. Depending on the design, many turtle tanks are not filled to the top and would therefore not be adequate for this type of filter. If your tank can be filled to the top, this filter works, I would only consider it as a booster filter though, as most are not powerful enough to handle the load from a turtle inhabitant.
The Filter shown in the picture is here – Check it out!
Best Turtle Filter
In LLYT’s opinion, the best filter on the market for a turtle aquarium (up to 150 gallons per filter) is the FLUVAL FX series filter. This filter series, including the FX4 and FX6 specifically, is incredibly powerful, has a ton of space for filter media, and operates extremely efficiently, and quietly. It is easy to maintain with quick release hosing, self priming, and bend-proof tubing. It is definitely on the expensive side but if you can save up the money, BUY THIS FILTER. It will save you hours and hours of time you might be wasting cleaning out less powerful or less efficient filters and the corresponding tank. This filter is also probably the last in line for upsizing too. If you got your turtle buddy small, they will grow! Certain breeds reach 12+ inches by the time they mature. Buying a new filter every time you upsize the tank for a growing turtle can get really pricey. In fact you will spend way more money overtime upsizing your filtration. So if you can take the wallet hit now, do it to save yourself time and money in the future. If you have a 300 gallon tank, I would recommend two of these filters. Pricey, I agree, but over time it is a cheap option if you value your time as much as your money!
Fluval FX6: Get it here!

Best Budget Turtle Filter
Not everyone has the cash to get a filter like the Fluval FX6 mentioned above. In that case, I recommend the Polar Aurora HV304B canister filter. While this filter is missing a bit of oomf (power, efficiency, quality, ease of maintenance, ease of installation), it is dirt cheap for what you get. Overall, this a solid canister filter that I have been using with delight. Be careful not to be too rough on it while setting it up as the parts are a bit flimsy. This filter is actually a generic filter that can be found under different brand names including SunSun, All Pond Solutions, and Flexion. There are all sorts of sizes so choose the one the best fits your tank size. To match an FX6 (my favorite filter) I would recommend two of the filter specifically mentioned here which will still run you half of the price of the Fluval FX6! Check out LLYT’s video setting this filter up here! https://www.youtube.com/watch?v=-PKQdjizkT4
Polar Aurora Filter (HV-304B) – Get it here!

Honorable Mention – Best Small Tank or Hatchling Turtle Filter
The last filter is close to LLYT’s heart. Why? It was my first turtle filter. It powered me through the beginning stages of the hobby with my three hatchling turtles. It is the Turtle Clean 318 (See it here!). It is a small submersible filter meant for small turtles and tanks. This filter is only good for a maximum of a 10 or maybe a 20 gallon tank with one 1″ turtle, but it does a great job for how compact and simple it is. The media is super easy to remove and clean and the best part, its super cheap! A great use of this filter after your turtle has grown up is for temporary enclosures if you are moving, traveling or just need your turtle to be somewhere else while you get something done. Use it in a bucket or plastic bin as a fantastic, quick turtle filter.
TurtleClean 318 – See it here!

Examples of Filters You Could Use for Certain Sized Tanks:
Below is a selection of excellent filters to use for your turtle tank. The suggestions are broken up into budget and premium. Remember, the bigger you can go earlier on, the easier your life will be down the road when your turtle grows.
Turtle Size | Tank Size | *Budget Filter | **Premium Filter |
1-2” | 20 Gallon | ||
3-4” | 40 Gallon | ||
5-6” | 55 Gallon | ||
6-8” | 75 Gallon | ||
9-11” | 150 Gallon | (2x) Polar Aurora | |
12”+ | 300 Gallon | (3x) Polar Aurora | (2x) Fluval FX6 |
*Budget Filters get the job done, they just might not have the fancy bells and whistles (e.g. self-priming, internal computers, super easy maintenance).
** Premium filters are excellent filters but more pricey. Maintenance is typically easier, the filter runs more quietly and is generally more reliable
Turtle Filter Media
If you are feeling adventurous or want to optimize your filter to be even more efficient, changing your filter media is the way to go. Filter media comes in many differernt forms including foam pads, cermaic rings, plastic balls, sintered glass and many many more! The big question, which one do you choose. Now that is a highly debated subject. For this section I will summarize the most popular types of filter media and some great options that exist. But let’s first talk about what order filter media should be placed. Let’s take a ride down the filter slide!
First things first! All filters essentially work on the same principal. Their job is to take water from your tank, remove waste/bacteria or other undesirables using a series of filter media, then return clean water back to your tank. The order of your filter media types is very important. Most filters work in series, in other words the water goes from one location to the next and never returns to the previous location nor does it by pass a certain section (unless there is a clog). Therefore, filter media can easily be setup in the correct order if you know what way water is flowing in your specific filter. Keep in mind that this can vary greatly depending on your filter. The filter instruction manual that comes with the unit should tell you how the water flows through the system. If it does not, look it up on the vast information highway called the internet, someone somewhere has probably figured it out for you free of charge! Of course, over time filter media gets dirty and becomes less effective. When this happens, your filter should undergo maintenance which typically involves rinsing or replacing the media inside to remove waste buildup. To make the order of filter media short and sweet for you, check out the diagram to the right. While there are a million and one ways to set up a filter, this is the most widely accepted order of media to get the most bang for your buck.
Below I describe each type of filtrations.

1. Course Sponge
The course sponge is your filter’s first line of defense. The large cavities in the sponge allow water to easily pass though but the big crap (e.g. poop) is caught here. The crap is slowly broken down as water passes over it hopefully disappearing into the rest of your filter over time. This sponge will need to be cleaned periodically as the filter begins to buildup waste. Most filters include this media. If you need to replace the sponge, try finding an aftermarket brand as the filter brand can be very expensive (for what you are getting). You can easily cut large foam pads (like this one) to fit your specific filter and save a pretty penny.

2. Fine Sponge
The fine sponge, sometimes called a polishing sponge, is next in line to capture the crap. This sponge has a much higher density and catches smaller particles. Similar to the course sponge, these hopefully breakdown further while trapped on the fine sponge and are eventually dissapated enough to travel further along the filter media train. I find that this stage is the fastest to gunk up and decrease the performance of the filter. This is also the filter pad that can be rinsed a few times but will most likely need replacing. Similar to the course sponge, non-filter brand options are available to help save money (like this one)

3. Biological Media
Now to the most important media in your filter. Biological media should be placed after your sponges. The role of biological media is to house beneficial bacteria that break down ammonia and nitrites into nitrates, which results from the decomposition of waste (crap, pee detritus and more!). Refer back to the top of this page where we discussed the nitrogen cycle, to learn more about this process. But essentially, biological media is the driver to make water non-toxic for aquarium inhabitants. With that said, the more biological media you can fit in your filter the better. Below are my favorite types of biological media:
Ceramic Rings – Get them here
Sintered Glass – Get them here
I am not a huge fan of relying on sponges to be biological filters especially when it comes to turtles. Sponges collect debris over time and require cleaning more often. Ceramic rings, sintered glass, or bio balls do not collect as much waste over time and really may only need a light rinse when you do filter cleaning. CAUTION: when doing filter cleanings, be aware that the longer you take to clean it out and the longer your biological media is exposed to the air, the more beneficial bacteria that die off. Rinsing your media with chlorinated water will further exarcebate this. This is not usually an issue since tank surfaces and surviving bacteria will multiply and repopulate the media but do keep it in mind especially if there are more sensitive inhabitants in the tank (e.g. fish).


4. Carbon
This is the final media your tank water should pass through. This media is actually optional as it is not required in the nitrogen cycle to remove toxic compounds like ammonia and nitrite. Carbon or activated carbon, also known as charcoal, is a chemical filtration media (use aquarium safe products, not straight coal!). Using absorption and adsorption, carbon removes organic and inorganic compounds, odors and can help make you water appear clear. Carbon is a consumable media and must be replaced periodically as recommended by the manufacturer. Like I said this is not required but it does have its benefits as stated above. Get some here

Longliveyourturtle.com is an educational site for aquatic turtle owners, future owners and hobbyists interested in general turtle care information. All information provided is accurate to the best of Long Live Your Turtle LLC’s knowledge and belief, but is presented for educational and sometimes entertainment purposes only. No information on this site should be considered authoritative with respect to human health or animal health and husbandry. Full disclaimer can be found at here.